Guide for Data and Computation Team Members#
This is a short write up facilitate the spin up of new team members for the Data and Computation Team and describe regular maintenance tasks.
Onboarding#
Checklist for new members#
Ask to be added to the Data and Computation Github team
Ask to be added to the
@data-and-computeSlack user groupSubscribe to Relevant Slack channels
Consider enabling notifications for Relevant github repos
Make a PR to the
_config.yamlfile here in a PR. to add a picture and your personal data to the webpage.Get access to the Grafana Dashboard
Request access to a service account to monitor Google Dataflow and Storage from the Google Cloud Console by raising an issue here
Instructions for admin:
Go to the Google Cloud Console > IAM > Grant Access
Add the following permissions:
Dataflow AdminStorage AdminLogs ViewerMonitoring ViewerLogs ViewerCompute Viewer
Relevant Slack channels#
data-and-computation-team: Private channel for internal discussions, please contact the Manager for Data and Computing to be added.leap-pangeo: Community wide channel where LEAP-Pangeo users can ask questions. Members of the team should join the channel and regularly engage with issues raised.
Relevant github repos#
leap-stc.github.io: The source for the LEAP-Pangeo technical documentation. This also contains LEAP-Pangeo Discussion Forumdata-management: Contains all the LEAP catalog based code/automation to ingest new datasets. Point users to the issue tracker to request new datasets.
Regular Maintenance#
This section documents common tasks performed as part of the Data and Computation Team’s duties.
Monitor User Directory Useage#
The user directories of all members are on a shared volume of fixed size. We pay for the total size of the volume no matter if it is used or not, so we should strive to keep usage to a minimum. Our current policy is that <50GB per user is acceptable. Unfortunately we do not have a technical way to implement per user quotas, so we need to regularly check two things:
How much space is left on the entire shared volume? If the free space falls below 20% we need to discuss further actions.
Which users are taking up more than the allowed 50GB. For users who take up more than 50GB the suggested action is to reach out via slack or email.
Regularly Updating the Software Environment#
We aim to provide users with up-to-date default software environments. This currently requires to change the pangeo-docker-images tag manually.
Make sure you are subscribed to release notifications on pangeo-docker-images to recieve Github notification about new releases
To bump the version, submit a PR to this config file in the 2i2c infrastructure repo. In that PR you need to change the image tag for all image choices, see an example here.
To send emails, a token file is setup as the OAUTH_GMAIL_CREDENTIALS Github Secret in the member management repo; every so often (around biweekly) the action will require re-authentication, generating a new token that should replace the existing secret. This makes use of OAUTH_GMAIL_CLIENT_SECRET, which never needs to change. To update the OAUTH_GMAIL_CREDENTIALS secret, run the
generate_emails_token(github_action_mode=False)function from utils.py locally, which will direct you to a confirmation screen. Log in to the leap.pangeo@gmail.com account and authorize access. You will require a copy of the CLIENT_SECRETS file on your personal machine which can be retreived from Google Cloud Console from the above pangeo support email.
Offboarding members#
[] Delete personal
dct-team-<first_name>service account in IAM (needs admin priviliges).
Admin Tasks#
This part of the guide is reserved for team members with admin access to the 'leap-stc' github organization!
Renewing Personal fine grained access token for LEAP member management#
In order to automate member sign up by adding github users from a private Google Sheet to the appropriate github teams (via this gh action) the github action needs the appropriate priviliges to add/remove members from teams. We are currently handling this by providing a personal access token as the "ORG_TOKEN" secret. The person creating the token will usually be the Manager for Data and Computation.
Note
Ideally we want to remove the dependency on a single user account here, but for now this is the only way I have found this to work properly. Maybe there is a way to establish a ‘dummy’ user?
Steps#
Make sure you have access to set secrets on the private member_management repo
Go to the personal account “Settings>Developer Settings” Tab. From there naviate to “Personal Access Token>Fine-Grained tokens”
If present click on “LEAP member management token”, othewise create a new token with that name (the actual name is optional here, but make sure to name it in a memorable way), and authenticate.
Generate or regenerate the token
The required permissions are “Read and Write access to members” and “Read Access to actions and metadata”
Set the expiration to a full year (the current limit set on the org level)
Make sure to copy the token (leave the page open until the next step is completed, since you will have to recreate the token once the page is closed!)
Go to the member_management repo and navigate to “Settings > Secrets and Variables > Actions” and open the “ORG_TOKEN” to edit
Paste the above token from the clipboard and save.
Run the Member Add Action and confirm that it is successful
Close the token page and you are done!
Handover Checklist for Admins#
The following is a list of tasks that should be done by any new hire in the Data and Computation Manager position to ensure smooth operations.
Moving Data between buckets using bare VMs#
In general you need some form of compute to move data between different object store locations, but be aware that the data will be always be streamed to and from that location over the internet, so fast connection speed is key for fast transfers. There are a variety of ways to move data with perhaps the easiest being to run fsspec or rclone on your local computer, but speed is likely limited by your local internet connection. For certain tasks e.g. moving data to admin only publishing buckets on the OSN pod it is recommended to use rclone on a VM
Tip
These instructions should be easy to adapt to VM instances on other clouds, and can likely be automated to a much larger degree, but this is what has worked so far. Ultimately this approach is a somewhat manual implementation of the concept of skyplane which sadly does not seem to be actively maintained anymore. As of the writing of these docs we were able to achieve ~700MB/s transfer speeds with a single VM following the instructions below
Manual spinup of cloud VMs for bulk data transfer#
Following these instructions requires permissions on the LEAP Google Cloud Account. Contact an admin if you run into permission issues.
Warning
Using VMs this way does not automatically delete instances. Make sure to do that when your transfer is done.
Navigate to the Google Cloud Console and from there to “Compute Engine” and “VM instances”
Click on “Create Instance”
Configure your VM instance (this is an example config that worked well in the past, you can modify as needed). If not specified below leave all settings on the default.
Choose a memorable name like “boatymccloneface”
Use a region that is close to your storage (for LEAP buckets this is
'us-central1'and leave the zone on'Any'Choose an
'E2'machine type preset (heree2-standard-8)In “OS and Storage” select the latest “Ubuntu” version as Operating System and “Balanced persistent disk” as Boot disk type.
Set the size to 20GB
Under “Observability” enable “Install Ops Agent …”
(Only needed when source location is on GCS) Under “Security” change “Access scopes” to “Set access for each API”, and set “Storage” to “Read Only”.
(Optional cost saving) Under “Advanced” select
'VM provisioning model: Spot'(this means the instance can shut down at any time, and you will have to rerun these steps to pick up the transfer. If you want the job to finish guaranteed, choose “On Demand”, but be aware that this will come at a higher cost).Optional but highly Recommended: Under “Advanced” enable “Set a time limit for the VM”, and limit it to the number of hours you expect the transfer to take. You can choose to either stop or delete the VM under “On VM termination”. If you choose stop you will keep incurring costs for the storage volume, so unless you expect to restart the instance, choose delete here.
Click on “Create”
You should now be able to see your instance in the list under “VM Instances”. Click the SSH button to tunnel into the VM
Install rclone with
sudo -v ; curl https://rclone.org/install.sh | sudo bashStart a tmux session with
tmux new(cheatsheet for tmux)Set the config via env variables one by one. The exact details might depend on your source/target storage. See the rclone docs for more details. This example copies from the LEAP gcs buckets to the OSN pod
export RCLONE_CONFIG_SOURCE_TYPE=gcs
export RCLONE_CONFIG_SOURCE_ENV_AUTH=true
export RCLONE_CONFIG_TARGET_TYPE=s3
export RCLONE_CONFIG_TARGET_PROVIDER=Ceph
export RCLONE_CONFIG_TARGET_ENDPOINT=https://nyu1.osn.mghpcc.org
export RCLONE_CONFIG_TARGET_ACCESS_KEY_ID=XXX
export RCLONE_CONFIG_TARGET_SECRET_ACCESS_KEY=XXX
Run the transfer!
rclone sync --fast-list --s3-chunk-size 128M --s3-upload-concurrency 128 --transfers 128 --checkers 256 -P source:leap-persistent/some/prefix/ target:osn-bucket-name/another/prefixChoosing
synchere enables you to restart a transfer if it failed (e.g. due to a spot instance being shut down, or the transfer taking longer than expected).The additional flags passed here seem to work well for past transfers, but they might be tuned for better performance in various scenarios.
Watch the transfer progress or work on something else ☕️
You might get disconnected from the SSH browser window after a while (this is why we run the process within tmux!). Simple click on SSH again and run
tmux ls. Pick whatever session you want to re-attach. Then dotmux attach -d -t <session id>to re-attach it to a new tmux instance and release it from the old one.Important. DO NOT SKIP!: When your transfer is finished, go back to Google Cloud Console and from there to “Compute Engine” and “VM instances” and click the three dots to the right of your instance, and delete it. If you forget about this LEAP will keep paying for the instance!
Non-Technical Admin Tasks#
This section describes admin tasks that are necessary for the maintenance of LEAP-Pangeo components (including collaborative efforts lead M²LInES) which require appropriate permissions, but no coding (everything can be achieved on one of several websites).
Member Sign Up Troubleshooting#
Ideally members should be signed on automatically and well ahead of any event (see Member Sign Up Procedure for an overview of our member sign up mechanics). But despite the best efforts situations arise where either staff or the organizers/instructors of an event need to quickly sign on new members, and troubleshoot if certain users do not have access to the JupyterHub. Follow the steps in this Flowchart to quickly resolve any issues in such cases.
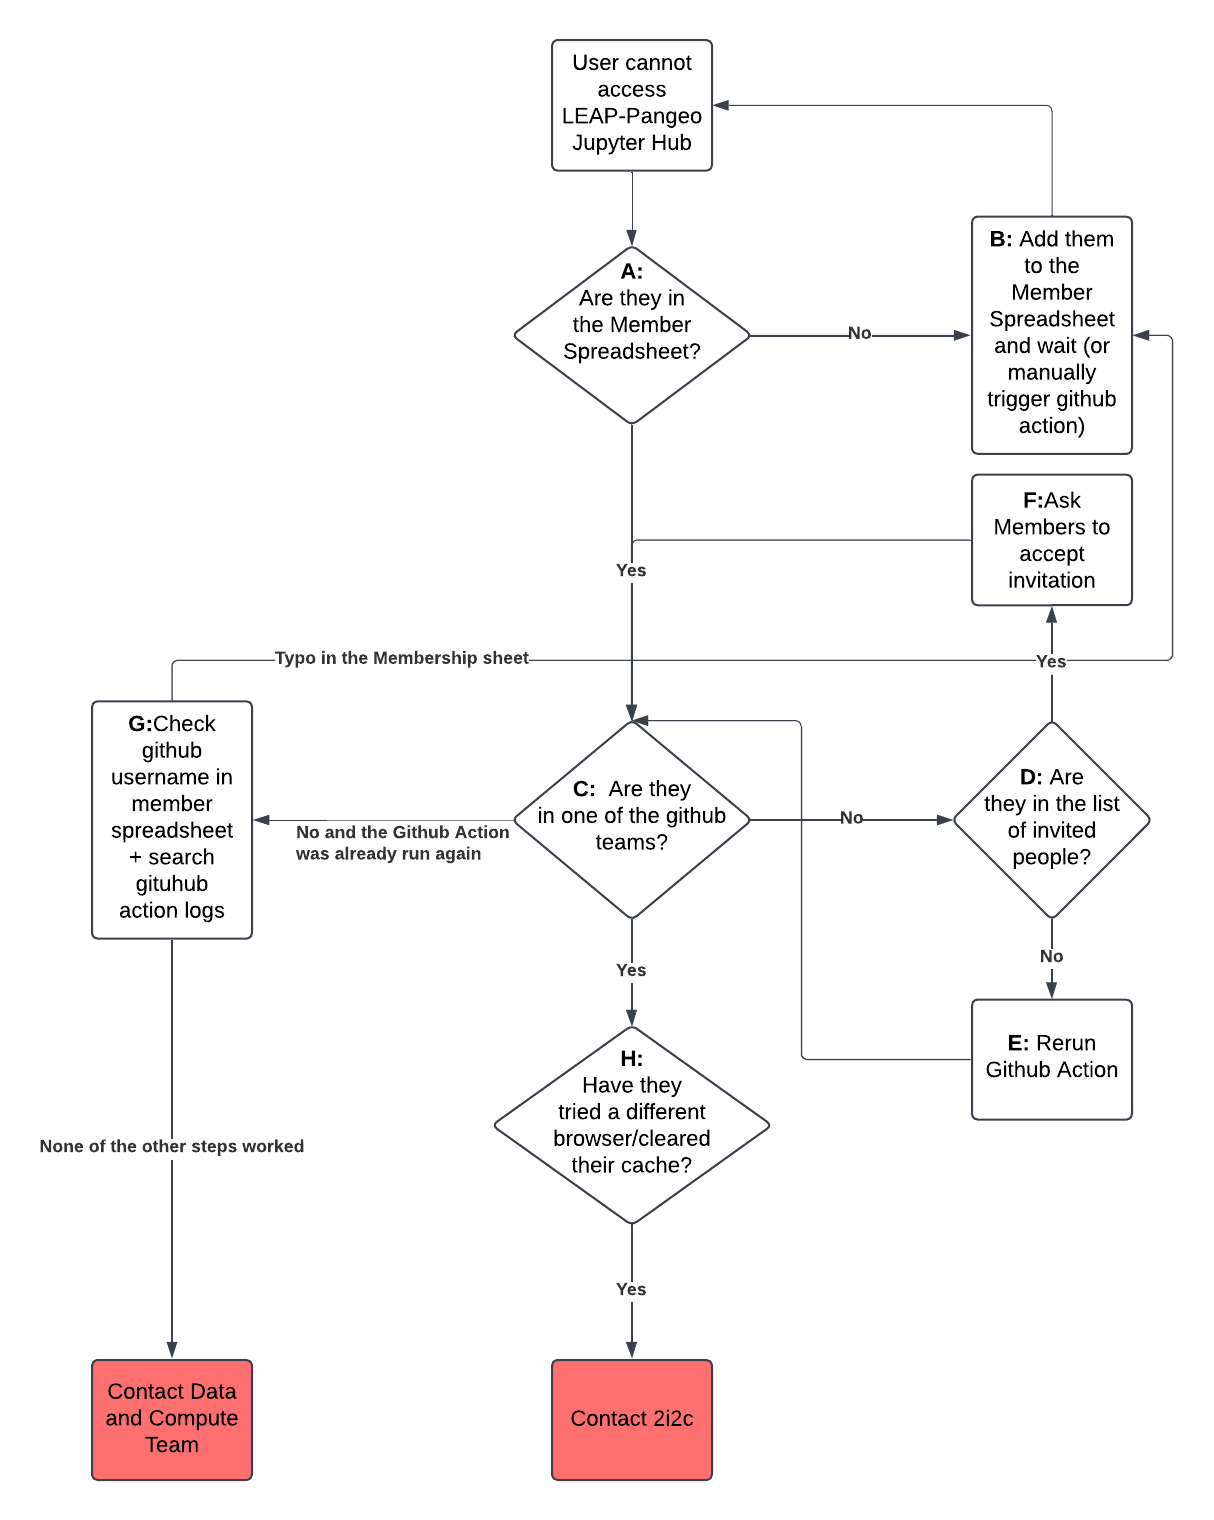
A+G: Check if a user is in the Member Spreadsheet#
Request read access or inquire with LEAP staff to confirm that the user(s) who are having trouble, are listed in the Member Data Spreadsheet and make sure the the sheet includes their github username. Always make sure that the github name exists (search in github), and does not contain extra characters like "@".
B: Add Users to the Member Spreadsheet#
If this is not time sensitive, make sure that the user has completed the membership application (more details here) and inquire with LEAP staff about the status of membership (adding users might take a while, thus always sign up users well in advance). In a time sensitive situation contact LEAP staff to expedite the addition of new users added to the Member Spreadsheet.
C+D+F: Checking Github Team Membership and invite status#
Repeat the following steps for all relevant Github Teams (you can find links to the team page here):
C: Navigate to the search bar at the top that says “Find a member…” and enter the github username of the user. If the name shows up the user is part of this github team
D: Right next to the search bar is a button that says “… pending members”. Click on that button and scroll down the list. If the username is in that list the member has received an invite, but not yet accepted it.
F: Accepting the invite has to be done by the user!. Point them to our FAQ’s for instructions on how to accept the invite.
E: Manually rerunning github sign up action#
Attention
You need to have maintainer access to the private leap-stc/member_management repo in order to follow these steps. If you cannot repeat these steps please ask one of the github organization admins to be added to an appropriate team (e.g. bootcamp-instructor) that has access.
Navigate to leap-stc/member_management
In the top rider click on “Actions”
On the left click on “Parse Member Sheet and Add New Members”
In the upper right corner, click on “Run Workflow”, and again on “Run Workflow” in the pop up window.
After a short while you should see a yellow circle in the main window, indicating that the github action is in progress. Wait until the action is finished (usually 3-5 minutes).
If the circle turns green, you are done. If the circle turns red, try to run it one more time to exclude any random issues. If the error persists, reach out to a member of the Data and Computation Team
H: Clearing Browser Cache etc#
If users are part of a github team, and still have trouble signing on, instruct them to clear their browser cache, or try a different browser. This step is unlikely to be necessary
If none of this works#
Note
This is a very unlikely scenario and has very rarely happend!
Follow the flowchart and reach out to either the Data and Computation Team or 2i2c support.
M²LInES OSN pod administration#
All administrative tasks pertaining to the M²LInES OSN bucket are handled via the Coldfront Portal. Please log in with one of your affiliated organizations and make sure to use the same one each time in case you have multiple affiliations.
The important units of division on the OSN pod are projects and buckets. Each project can have multiple buckets, and you can give others access as guests and admins on a per project basis. Buckets are how the actual storage space is organized, and each bucket will have access credentials and a storage quota, both of which might need actions from an admin from time to time.
Check Bucket attributes#
To check individual buckets’ attributes log into the Coldfront Portal, click on the relevant project, navigate to the “Allocations” section, find the bucket name in the “Information” column and click on the folder symbol in the “Actions” column.
Scroll to the “Allocation Attributes” section. You can see all relevant values here.
OSN Anonymous Access: If False, this data is public, no credentials are needed to read data (writing still requires credentials). OSN Bucket Quota (TB): Shows the currently allocated size. This is the max size, not what is actuall used! OSN RO/RW Bucket Access/Secret Key: Credentials for read-only (RO) and read-write (RW) access to the bucket. See OSN Pod Infrastructure reference for details.
Increasing Storage Quota#
If any of the buckets needs more storage space, follow these steps:
Log into Coldfront
Navigate to the project that contains the bucket (we currently separate projects for M²LInES, LEAP, and the LEAP-Pangeo Data ingestion)
Scroll to “Allocations” and find your bucket in the “Information” column. Click on the folder icon in the corresponding “Actions” column.
In the top right click on “Request Change” and scroll down to “Allocation Attributes”. Enter the desired new size in TB in the “Request New Value” column and the “OSN Bucket Quota (TB)” row and enter a short justification (required).
Click the “Submit” button.
You should see a green box with “Allocation change request successfully submitted. ” at the top of the next page.
Wait for email confirmation of the change.
Provision a new Bucket#
Log into Coldfront
Navigate to an existing Project (or create a new one; see below), scroll to “Allocations” and click on “Request Resource Allocation”
In the following dialog chose “OSN Bucket (Storage)”, write a short justification which includes whether you want the bucket to have anonymous (public) access!, and choose a size in TB.
Click “Submit”
Wait for email confirmation.
Create a new Project#
Note
You need PI status on the pod to create new projects. Reach out to the M²LInES admin to discuss this if you do not have access yet.
Log into Coldfront
Click on the “Projects” link on the homepage
Click “Add a Project”
Choose a title, write a short description of the project, and optionally choose a field of science.
Then click “Save”
Wait for email confirmation.
OSN Support#
For any questions/functionality not mentioned above, please refer to the OSN documentation or reach out to the OSN support ('help@osn.mghpcc.org')
Google Cloud Account Maintenance#
Attention
To follow these steps you need to have the appropriate priviliges on the LEAP cloud account/organization. Reach out to an organization owner if you need access.
All of the following steps are done from the Google Cloud Console
Billing#
Click on the ‘burger’ symbold on the top-left, and navigate to Billing or search for “Billing” in the bar on the top.
Check Running Costs (recommended weekly)#
Click on “Reports” on the left.
From the first drop down on the right, select “Last 90 days” (you can also select a custom time frame if you want to see longer term costs). Further Down on the right disable “Promotions & others” to see the amount spent from credits.
You should now see 3 bars in the center that indicate the monthly spending split into “Services” (e.g. compute, storage). You can further refine this partition with the options on the right, but this overview should generally be sufficient for routine cost monitoring e.g. to detect abnormally high spending.
Check remaining credits (recommended monthly)#
Click on “Credits” on the left to see current and past cloud credits including the total amount, and remaining value.
Make sure that enough credits are available for continued operation (based on the monthly costs). Contact Google to arrange for release of next credit round if funds run low.